Requirement : To enable the submit to workflow button on an EP page.
Assumption : The table is already workflow enabled in the network client.
Step 1: We will first create a web action menu called AFZEPInventTransWorkflowSubmit and specify the submit class object against it (assumption is that this is already created while the client workflow objects were created). In this case the submit handler class is called AFZInvMovementJourSubmitManager

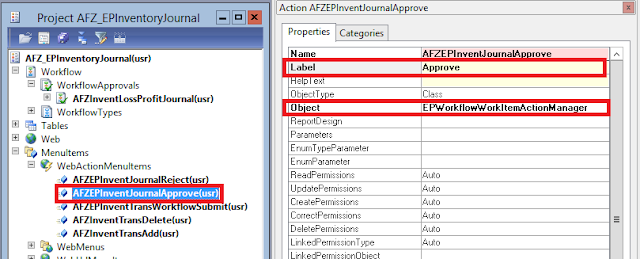
next, create WebActionMenuItems for each of the different workflow outcomes and actions like approve, reject, delegate, cancel etc. these would be used later in Step 3. The object property for these WebActionMenuItems must be set to EPWorkflowWorkItemActionManager as shown below.
Select the workflow template that has to be published on the portal. In this case we are exploring a template called AFZInventLossProfitJournal. Specify the SubmitToWorkflowWebMenuItem property with a Web action menu item created above.

Step 2: Update the Form on which the Submit link would be displayed. select the Workflow Approvals object under the approvals node in AOT as shown below. Generally the approval object would be with the same name as the WorkflowType.
Select the approval object and update the DocumentWebMenuItem with a WebUrlMenuItem used to display the form on which you expect the submit bar to show up.
Also update the WebMenuItems for ResubmitWebMenuItem and DelegateWebMenuItem (Highlighted below)

Step 3: Next open each of the Workflow outcomes and attach the corresponding ActionWebMenuItem to it as shown below.


Assumption : The table is already workflow enabled in the network client.
Step 1: We will first create a web action menu called AFZEPInventTransWorkflowSubmit and specify the submit class object against it (assumption is that this is already created while the client workflow objects were created). In this case the submit handler class is called AFZInvMovementJourSubmitManager

next, create WebActionMenuItems for each of the different workflow outcomes and actions like approve, reject, delegate, cancel etc. these would be used later in Step 3. The object property for these WebActionMenuItems must be set to EPWorkflowWorkItemActionManager as shown below.

Select the workflow template that has to be published on the portal. In this case we are exploring a template called AFZInventLossProfitJournal. Specify the SubmitToWorkflowWebMenuItem property with a Web action menu item created above.

Step 2: Update the Form on which the Submit link would be displayed. select the Workflow Approvals object under the approvals node in AOT as shown below. Generally the approval object would be with the same name as the WorkflowType.
Select the approval object and update the DocumentWebMenuItem with a WebUrlMenuItem used to display the form on which you expect the submit bar to show up.
Also update the WebMenuItems for ResubmitWebMenuItem and DelegateWebMenuItem (Highlighted below)

Step 3: Next open each of the Workflow outcomes and attach the corresponding ActionWebMenuItem to it as shown below.

Step 4: At this stage we are done with the workflow level changes. The next is to attach the workflow control on the user control. The workflowActionBar is attached to a Datasource and DataSourceView. These properties can also be used using the property sheet once the markup is pasted in the control body. It is important to mention the name of the workflow type being displayed.


