Wednesday, October 12, 2016

AX2012 EP Toolbar

Requirement: To add a toolbar for add and delete line on a grid.

Step 1: Create a toolbar with the desired actions. This step would internally have two steps in first we will create a WebMenu object
The next step would be to create a WebActionMenuItem for each action that you want to appear in the menu created above. Each WebActionMenuItem being created should be associated with a Class, and this class should have a main method which would be invoked when the menu item is clicked in the portal.

Once the WebActionMenuItems are created these are dragged and drop inside the WebMenu. In our example two WebActionMenuItems are created namely AFZEPInvenTransDelete and EPInventTransAdd with labels of Add line and Remove line respectively


We are now ready to render the toolbar on the user control. To add a toolbar, the toolbar control should dragged and dropped onto the grid control. Once the toolbar control has been created it has to be associated with the Menu created in the step above, this is done using the property sheet of the toolbar.


Tuesday, October 11, 2016

AX2012 EP Link list page with a edit form

Requirement : To open a details page when a link is clicked on the list page.


Step 1: Create a self relation on the table which would be the basis of the link. In my case this table is InventJournal. So we create a new relation called AFZInventJournalTable and in this relation we link InventJournal with InventJournal as shown below


Step 2: Create a menu item with the url reference of the sharepoint page to be opened
Make sure to mark the WindowMode as Modal so that the page does not redirect to a new link and instead opens in a modal window.


Step 3: Create a Display menu item that will be attached as the edit menu on the list page. On this display menu specify the WebMenuItemName (created in step 2). This will inform the system about the webpage link to be used to open a new form in the Portal mode.


Step 4: Attach the menu item on the List form in the grid control, on the column to be marked for the link. Select the Display menu item on the HyperLinkMenuItem property of the column as shown below.


Step 5: Deploy the list page. If already deployed don't forget to deploy again and refresh AOD in EP.

AX2012 EP Dimension display

The requirement is to add the dimension controller to the AFZInventJournal web control that i have created.

To display the dimension control against an EP form we have to reuse a component already provided for the same. The name of the web control meant for this purpose is called DimensionDefaultingEPController. At this point it is important to note how a user control can be used within another user control. This involves two steps
  1. Drag the user control to be embedded from the AOT browser to the project. 
  2. Include a reference to the added user control in the parent web control markup using a tag as follows: 
<%@ Register TagName="NameOfUserControl" Src="NameOfUserControl.ascx" TagPrefix="Dim" %> 
in this example we are going to embed two user controls into the main control. These are detailed below. We also need to ensure is that permissions are provided to the embedded control in the main control. Select the main control and navigate to the Permissions - Delete node, and add the component to be reused as shown below


Next open AFZInventJournal web control in Visual Studio for edit. Find the component to be embedded (DimensionDefaultingEPController) in the AOT explorer and add it to the project. When this is done both the AFZInventJournal and DimensionDefaultingEPController will be available in the same project


It is also important at this stage that we add reference to the application proxy object. The application proxy is a wrapper class created in dot net and used to call a class function of any AX class.

A step by step process to create a proxy object is Create Proxies for EP User Control

The user control (parent control) that would host the DimensionControl should also extend AxBaseUserControl and the class declaration for the same should look as below

public partial class AFZInventJournal : AxBaseUserControl
{


Now switch to the layout mode of the user control and figure our a section where you wish to have the dimension control displayed please add the below as shown below


The layout of the screen at this stage would be as follows:


Add a reference to the EP Proxy object as that is used in the DimensionController user control.


We are now ready to start addressing the dimension related requirements on the EP form. The typical requirement would be to display and save the dimensions values. To display the dimension the RecId stored in the default dimension columns should be passed on to the user control.

At this stage it is important to understand that if a column is not bound with a control then by default the value of that column will not be fetched in the dataset. To ensure that all field values of a dataset are fetched (irrespective of being bound) the data set property OnlyFetchActive should be set to false. Screen shot below


We first create a function a relation between the child user control and parent. For this select the user control presentation on the form and define the creating controller function as follows


Double click the CreatingController event and write the below code
    protected void DimensionAttributesControl_CreatingController(object sender, EventArgs e)
    {
        DimensionAttributesControl.Controller = DimensionDefaultingController;
    }

Next we create two functions to display and save the dimension
    ///
    /// Copy current dimension to CustTable
    ///

    protected void SaveDimension()
    {
        // retrieve the ID of the DimensionAttributeValueSet record that is associated with default values
        // currently displayed          
        long newDimensionAttributeValueSetId = DimensionAttributesControl.DimensionCombinationId;

        DataSetViewRow row = this.CurrentRow;
        if (row != null)
        {
            row.SetFieldValue("DefaultDimension", newDimensionAttributeValueSetId);
        }
    }

    ///
    /// the below method is used to read the defautlDimension RecID and bind it with the DimensionDisplayEpController
    ///

    protected void displayDimension()
    {
        long dimensionAttributeValueSetId = 0;
        DataSetViewRow row = this.CurrentRow;
        if (row != null)
        {
            // get the DimensionAttributeValueSet record ID associated with the current record
            dimensionAttributeValueSetId = (long)row.GetFieldValue("DefaultDimension");
        }

        // specify the DimensionAttributeValueSet record from which to display the default values
        if (dimensionAttributeValueSetId != 0)
        {
            DimensionAttributesControl.DimensionCombinationId = dimensionAttributeValueSetId;
        }
    }


    ///
    /// Returns the current row
    ///

    private DataSetViewRow CurrentRow
    {
        get
        {
            try
            {
                DataSetView dsv = this.AxDSInventJournalTrans.GetDataSet().DataSetViews["InventJournalTrans_1"];
                return (dsv == null) ? null : dsv.GetCurrent();
            }
            // CurrentRow on the dataset throws exception in empty data scenarios
            catch (System.Exception)
            {
                return null;
            }
        }
    }


Once this is done we need to call the display and save functions at the right events and the process is complete !!

    protected override void OnPreRender(EventArgs e)
    {
        if (!Page.IsPostBack)
        {
            displayDimension();
        }
        base.OnPreRender(e);
    }


   protected void GridInventJournalTrans_SelectedIndexChanged(object sender, EventArgs e)
    {
        displayDimension();
    }


Thursday, October 06, 2016

AX2012 EP Page Title

To change the title of a custom added page on the Enterprise portal

1. Import the sharepoint page into AOT. Goto the web url menu item and import the page in consideration

Once the page has been imported into AOT it will be visible under page definitions in the AOT

Select the page in question and pull up the property list. In the property list change the title to the desired title sting


The other scenario to change the page title would be when the user control needs to use a context and change the title of the page. In such cases the page load event of the user control can be used as shown below.

protected void Page_Load(object sender, EventArgs e)
{
    ITitleProvider titleProvider = AxBaseWebPart.GetWebpart(this) as ITitleProvider;

    // Specify the title to pass as the AxPageTitle
    titleProvider.Caption = "Page title goes here";

    // Do not include the context in the title
    titleProvider.ShowContext = false;
}

For the above code to work it is important that a link of the userControl web part is established with the AXTitle web part, using the EP page edit option as shown below


AX2012 EP Multiselect list control

This blog is about creating a mulitselect option. To begin with the various steps involved in the process would be as follows

  1. Creating a drop down list with select option.
  2. Building a string based on the selections made in the list and displaying this list in a text control.
  3. Building the select list based on the text string in the linked text box, so that when the drop down is clicked these values are pre-selected in the list box.
This blog is a continuation from the previous blog entry

Step 1: Creating a drop down list
A drop down list would be populated from a table or view created in AX. Queries in portal are consumed using a dataset object in AOS, hence lets create a dataset in AOS.

Once a dataset object has been created in AOS the same should be consumed using a AxDataSet object on the toolbar. The AxDataset will be set to consume the dataset object created in AOS. Lets create a AxDataSource object and call it DatSourceWorkerInfo as shown below

A textbox along with a drop down list is created on the control. The drop down list will be added with events to populate the data and update the associated text box. Lets create a text field called txtEmpNo (readOnly) and a AxLookup control called axEmpNoLookup as shown below

The codebehind for the drop list (axEmpNoLookup) will be added for two events OnLookup and OnOkClicked as follows

                            OnOkClicked="worker_OkClicked" OnLookup="worker_OnLookup"
                            AllowMarking="True" AutoPostBack="True">


Wednesday, October 05, 2016

SSRS EP Report Parameters

This is my first post on Enterprise Portal of AX 2012. There a lot of terms, that i have come across while trying to get this assignment done. I have tried to build my own interpretation of these terms, so would like a disclaimer that some of these might not be entirely correct.

The agenda is to publish a certain report on EP along with accepting the filter parameters.

UserControl: This term is often come across when dealing with EP development. A user control is an equivalent of a Form in AX which can render a presentation layer. The difference being that a user control further needs a sharepoint webpart to be hosted within.

To facilitate creation of these user controls, the EP framework has some templates defined and these can be used to create a user control. The templates can be accessed once the project is selected, followed by click on the project menu -> Add new item


For designing a request form to accept the report parameters, please use the "EP User Control with Form" Template. Also take care to change the name of the control at the time of selecting an item, changing the name later has issues syncing the objects with AOT.

The elements on the user control are picked used a group designed for AX on the toolbar. The group is called dynamics AX (shown below, highlighted in red) 


At this point it is important to understand the different files that are generated as a part of instantiation from the template.
The first file is AFZLeaveDetailsReport.ascx; this file stores the basic structure of the presentation. The ascx file is something like a webpage which has the html markup but not the code.

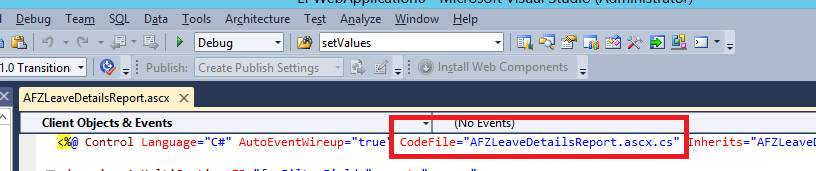
The second file is the AFZLeaveDetailsReport.ascx.cs; this file contains the control definitions for the different controls used on the page. This is basically where the code and events for the controls are created. The link between the two files is created using a codefile tag in the source file ("AFZLeaveDetailsReport.ascx") also shown below  


The third file is the AFZLeaveDetailsReport.aspx.designer.cs; this file contains the definition for any server controls that are used on the markup file ("AFZLeaveDetailsReport.ascx"). This allows the visual studio to do intellisense in the code behind page based on the controls used on the markup page.

( Note: i wondered why the definitions could not be stored in the markup files itself ; the probable reason is that the markup files being units of html have to follow the html standard/format. But this is just a guess )

Now one can design the layout of the request form. We can use a combination of AX controls and asp controls to create a GUI of our choice. Assuming that this GUI would  be used to accept the values for the parameters of the report in focus; once the parameter values have been gathered on the form these will have to be passed on the report object. I have conceived a design where there would be a command button on the form to trigger the report.

To be able to print SSRS report AX Report Viewer control  (shown below) can be used


Just drag and drop this on the user control to create the required construct. Once the control has been dropped it would create a tag as follows: -


 in the above tag ID and MenuItemName have been manually updated using the property sheet in the GUI. The menu name is the output menu item that has an SSRS report attached to it.

To look for and edit the code behind the Print Report button, double click on it and the editor would automatically open the CodeBehind file ("AFZLeaveDetailsReport") with the right parameters for the button on_click event.


The way to pass parameters is to collect them into an dictionary object with an ID name exactly like the parameter name on the report. ( to get the parameter names in the report, one will have to open the SSRS report in visual studio and copy and names from the parameter node of the report.)

Dictionary parms = new Dictionary();

parms.Add("SPYLeaveDetailDS_FromDate", txtFromDate.text);
parms.Add("SPYLeaveDetailDS_ToDate", txtToDate.text);
parms.Add("SPYLeaveDetailDS_EmployeeList", txtEmpNo.text);

// Add the parameters to the report control 
this.LeaveDetailsReport.AddParameters(parms);


Please note that in EP a report would not render if the DP class for the same is extended from SrsReportDataProviderPreProcess. If you have a pre-process report then please consider changing it to SRSReportDataProviderBase

Monday, September 19, 2016

Cannot create a record in Database log (sysDataBaseLog)

Encountered this error recently and this had bought the complete environment to a stand still as the implementation was making extensive use of database logs.

We did a full compile of the application but that did not help. Ultimately had to resolve to code debugging. I found this issue to be that of a duplicate RECID being generated for a record insertion into the sysDatabaseLog table

As we know that the seed value for RecID generation for a table is done using SystemSequences table. I hence found the max(RecID) from the SysDatabaseLog table and updated this value (incremented by 1) into the NextVal column of the systemsequences.


PS: Any changes to the systemSequences Table were only visible to the AOS post a restart.

Thursday, September 08, 2016

Manage a cross server transaction without configuring MSDTC

Usually managing a transaction across two servers would require a distributed transaction controller being setup between the two server.

Below is a scenario where this is managed without a MSTDC configution.